Corel Draw X7 Logo Upload Vector File
Past Steve Bain
Acquire how to convert bitmaps to vector images using the PowerTrace feature in CorelDRAW. Say someone easily yous a printed logo only what you actually need is a digital vector file – preferably in CorelDRAW (CDR) format. If you've run into this scenario earlier, you may already know how time consuming the manual vectorization process can be. Adapting images from the physical earth into the digital vector realm often requires hours of piece of work and a mastery of drawing tools. If yous own CorelDRAW Graphics Suite, y'all've got a powerful tool to assistance with the heavy lifting! In this tutorial, you'll discover how easy it is to catechumen pixels in raster, jpg, or bitmap to vector shapes with Corel PowerTRACE.
How to Convert Bitmaps to Vector
This tutorial has been written for CorelDRAW Graphics Suite X7. While some features might be available in previous releases, the tutorial volition exist fully applicable to CorelDRAW Graphics Suite X7 and higher.
In this tutorial we'll take you step-by-stride through the procedure to catechumen bitmaps to vector images, demonstrating a bitmap-tracing project that will enable you to apace produce an authentic two-color vector version of a logo pattern without the need of a vector converter. Along the way, y'all'll larn how to use many of the powerful features engineered into PowerTRACE that make the process fast and efficient.
A Primer on Vectorization with PowerTRACE
If this is your offset tracing experience, some advance orientation may assistance demystify the tools involved. With a bitmap selected in CorelDRAW, PowerTRACE becomes bachelor through theTrace Bitmap command on the holding bar.
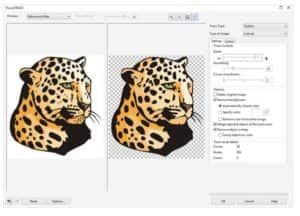
Yous tin instantly trace a selected bitmap and use the default settings by choosingQuick Trace from theTrace Bitmap list box, which applies the trace without opening thePowerTRACE dialog box. Alternatively, you lot can arrange the settings in thePowerTRACE dialog box (shown below). In that location are 6 modes that you tin can choose from, depending on your tracing requirements. The dialog box is divided into two areas. The left side displays a preview of your trace results, while the right side features 2 option areas.
Across the top of the dialog box are viewing and zooming tools, and across the lesser are theUndo,Redo, andReset buttons.
If you have previous experience applying bitmap filter effects in CorelDRAW or Corel PHOTO-PAINT, the PowerTRACE tools volition seem like familiar territory. TheSettings tab is divided into several key areas, including trace controls and trace options. TheTrace consequencedetails area (shown beneath) provides critical information every bit you adapt the tracing options. TheColors tab includes controls that let you manipulate the color space of the traced results. Follow the tutorial steps below to explore how hands these settings can be applied and modified to produce exactly the tracing results you need.
Earlier yous convert bitmaps to vector images
The bitmap images that you are vectorizing volition very likely come from one of ii sources: a file that is prepared in a drawing or bitmap-editing application and exported to one of the many available bitmap formats, or a file acquired via an image-capturing device such as a scanner or digital camera.
The source of your bitmap prototype can significantly influence its inherent quality. Software-generated bitmaps are the best to work with, while scanned images frequently require some refinement before they tin can be accurately traced. In the steps that follow, we'll look at both scenarios.
We'll exist tracing ii bitmaps. Both are CMYK images that have a resolution of 200 dpi and depict the same logo. The first version was exported from a drawing program (CorelDRAW), while the second version was scanned by using a consumer-brand flatbed scanner. Our goal is to produce a usable vector version of the logo prepared in ii PANTONE® spot ink colors.
Tracing an exported bitmap to vector
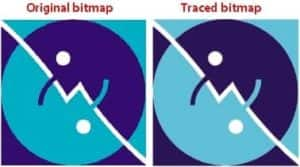
1. In a new CorelDRAW document, import the commencement bitmap (shown below). Past default, the imported bitmap is selected with thePick tool.

2. Click theTrace Bitmap button on the property bar, and chooseOutline Trace > Logo. ThePowerTRACE dialog box opens and produces a preliminary trace of the bitmap.
3. TheSmoothing andDetail sliders at the pinnacle of the Settings tab are automatically set. The preview window displays a split-screen preview of the Before and After results (every bit shown beneath), and theTrace upshot details area indicates that at that place are 14 curves comprised of 238 nodes and 3 colors
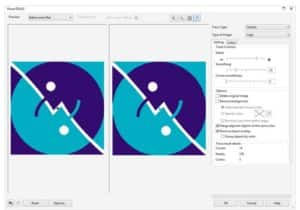
4. Since the background of our logo is white, PowerTRACE automatically detects and eliminates the surrounding background color. To remove the white expanse in the interior of the bitmap, enable theRemove color from unabridged image cheque box (shown beneath). Notice that theTrace effect details expanse now indicates that just 8 curves are detected.
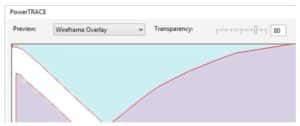
5. To bank check the tracing accuracy, chooseWireframe Overlay from thePreview list box. Use single left-clicks to zoom in and single correct-clicks to zoom out to examine the accurateness of the traced paths. If needed, apply theTransparency slider to adjust the visibility of the original bitmap. A close wait at the upper-left corner (shown beneath) reveals that the bitmap edges have been accurately traced.
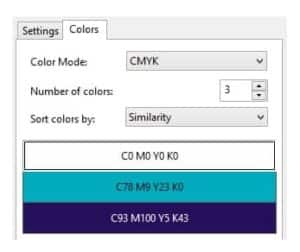
half-dozen. Click the Colors tab to examine the colour results of the trace, and chooseCMYK from theColor Fashion list box. Notice that three CMYK colors are listed at the peak (as shown next). Our next footstep will be to specify these colors every bit PANTONE spot ink colors.
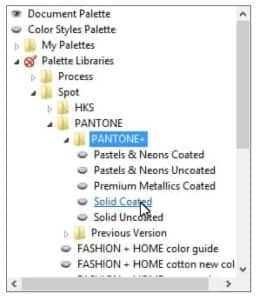
7. Click the turquoise color in the list, then clickEdit to open theSelect Colour dialog box. Click the Palettes tab, and choose PANTONE solid coated from thePalette list box. Notice that the PANTONE ink color equivalent of the CMYK value is automatically selected — in this case, PANTONE 7710 C.
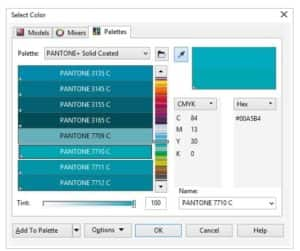
viii. ClickOK to close the dialog box and utilise PANTONE 7710 C as the new color. Discover that the colour listing (shown beneath) and the trace preview are updated to indicate the ink color you practical.

nine. Click the dark blue color in the list, and repeat the previous steps to alter the CMYK values of this color to a PANTONE color. You are now set to accept the trace results.
10 .ClickOK in the PowerTRACE dialog box to return to your CorelDRAW page. By default, PowerTRACE places the traced objects as a group directly on top of your original bitmap. Drag the grouping to one side to see both the original bitmap and the traced objects (equally shown below). The vector version of your 2-color logo is at present consummate. If you wish, delete the bitmap version from the CorelDRAW page.
Tracing a scanned bitmap to vector
In the previous steps, nosotros traced a bitmap that originated from a drawing or bitmap-editing application. Next, nosotros'll examine how to convert bitmaps to vector using the same logo simply a version scanned from a hard copy and saved in the same bitmap format.
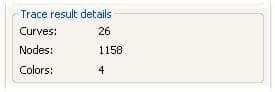
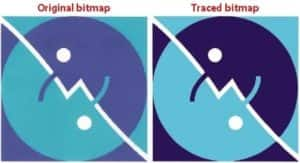
1. To begin the vectorization process, import the logo into a new CorelDRAW document, and chooseDetailed logo from theTrace Bitmap flyout on the property bar. ThePowerTRACE dialog box opens, and a preliminary trace is immediately produced. Now theTrace resultdetails area shows that 113 curves, 7707 nodes, and fifteen colors are detected (as shown beneath). At this point you could motion theSmoothing andDetail sliders to adjust the trace results and probable produce an excellent trace, simply here's a chance for you to larn an alternate strategy. Shut the PowerTRACE dialog box and render to the bitmap on your page.

two. To refine the scanned paradigm and improve the trace results, nosotros're going to apply a bitmap filter. As you can come across, this version of the logo includes scanning imperfections from the hard copy (encounter beneath). Eliminating these anomalies will drastically improve the tracing results.

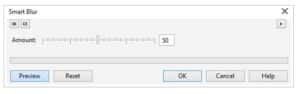
3. ChooseBitmaps > Blur > Smart Blur to open theSmart Mistiness dialog box (shown below). Set the slider to 60, and clickOK to apply the event. This operation will eliminate most — but not all — of the prototype's imperfections.
iv. ChooseBitmaps > Noise > Remove Noise to open theRemove Dissonance dialog box (shown below). Leave theCar check box enabled, and clickOK to apply the filter. This will eliminate virtually all of the remaining imperfections.

5. With the prototype selected, chooseDetailed Logo from theTrace Bitmap flyout on the property bar.
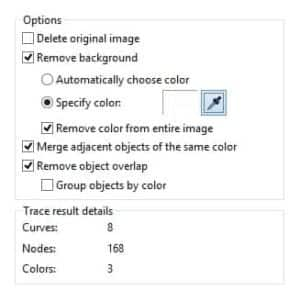
6. PowerTRACE opens and displays the trace results. Once over again, theSmoothing andDetail sliders settings are optimized. WithDetailed Logo selected, theTrace consequencedetails area now displays 11 curves, 236 nodes, and 9 colors detected (as shown beneath).

7. Click theColors tab to view the colors detected in the traced paradigm. Concur downCtrl, and click on each of the turquoise colors in the listing to select all three colors (as shown beneath). ClickMerge to combine these colors into a single color. With the single color yet selected, clickEdit to open up theSelect Colour dialog box, and modify this color to PANTONE 318 C as yous did in the previous steps.
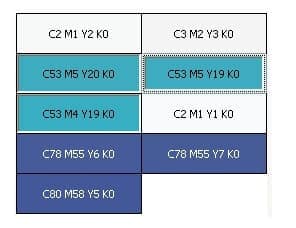
8. Echo the previous stride for the navy blue colors in the listing, changing them to a single color. Change the leftover color to PANTONE 274 C, and merge the remaining white colors in the list.
9. Return to theSettings tab, and enable theRemove color from unabridged image check box to eliminate the interior background shapes. Observe that the curve count is reduced. You are now set up to accept the trace results.
ten. ClickOK to shut thePowerTRACE dialog box and return to the CorelDRAW document. Drag the grouped traced objects to the right of the original bitmap and examine the results (shown below). Your tracing task is complete. If y'all wish, delete the bitmap version from your CorelDRAW page.
Although each bitmap may require its own special treatment, you can come across how powerful and easy-to-use the PowerTRACE features are. In only a few short steps, you lot've learned how to use PowerTRACE to catechumen bitmaps to vector, producing an accurately traced version of a circuitous logo using only a low-resolution bitmap as the source. Keep in mind that jpg to vector and other raster to vector conversions are equally straightforward.
Source: https://learn.corel.com/tutorials/convert-images-to-vector-files-quickly-and-easily-with-powertrace/
0 Response to "Corel Draw X7 Logo Upload Vector File"
Post a Comment